This article will guide beginners on configuring JuiceFS as a data persistence medium for Kubernetes. Kubernetes involves various concepts, and I'll explain the content in a concise and understandable language. However, note that this article assumes a basic understanding of Kubernetes cluster creation and management, as well as the fundamental architecture and usage of JuiceFS.
The persistence of data in Kubernetes is crucial not only for data security and reliability but also impacts the availability and performance of applications. When designing and deploying containerized applications, focusing on data persistence helps ensure system stability and resilience, especially when dealing with characteristics such as:
- Large-volume data storage requirements
- Significant fluctuations in data volume
- Need for data sharing among applications or with external Kubernetes clusters
Why use JuiceFS for Kubernetes data persistence
Kubernetes is a container orchestration platform responsible for managing the deployment, scaling, and operation of containerized applications. However, containers are transient and stateless. When a container instance terminates, the file system and data within the container are lost. To address this, PersistentVolumes (PVs) are created and mounted to store data, ensuring data availability when containers restart.
Kubernetes supports various storage media for creating PVs, including traditional local disks, file sharing, and multiple supported cloud storage solutions.
Traditional local storage solutions often face issues like single points of failure, poor scalability, and challenging management. Storage solutions provided by various cloud platforms for Kubernetes persistence are often tightly integrated with the platform, making it difficult to share data externally or migrate data to other platforms.
JuiceFS, as a cloud file system suitable for multi-cloud deployment, overcomes these limitations. It can meet common requirements for Kubernetes data persistence for several reasons:
- JuiceFS can use any object storage as its underlying data storage and any supported database as the metadata storage engine. It can be mounted, accessed, shared, and migrated on any device in any cloud.
- Multiple access methods: JuiceFS supports various access methods, including FUSE mount, S3 Gateway, WebDAV, Docker Plugin, CSI Driver, and HDFS API.
- JuiceFS supports simultaneous mounting and shared access on thousands of devices. Any system with the JuiceFS client, whether bare-metal, virtual machine, or containerized application, can share mounted access, regardless of location, as long as it can access object storage and the database.
- High performance: JuiceFS demonstrates excellent performance with block-level data chunking to enhance the read and write efficiency of underlying object storage. Independent storage of metadata allows tens of billions of PB-level files to be efficiently retrieved. Multiple caching mechanisms achieve performance close to local disks.
JuiceFS has more features beyond what is mentioned here. You can explore further details on the official website.
For this article, the focus is on how to install, use, and manage JuiceFS CSI Driver for data persistence in a Kubernetes cluster. Specifically, we’ll explore the installation process, ease of management, and how applications can utilize persistent storage.
JuiceFS CSI Driver's three operation modes
JuiceFS CSI Driver operates in three modes:
- Mount pod
- Sidecar
- Process mount
The availability of these modes suggests that each addresses specific scenarios and problems.
Mount pod mode
JuiceFS CSI Driver adopts the mount pod (container mounting) mode by default, which allows the JuiceFS client to run in an independent pod, and the CSI Node Service manages the life cycle of the mount pod.
The advantage of this mode: when multiple pods share the same PV, there is no need to create additional mount pods, and existing mount pods can be referenced. They’re automatically deleted when they’re no longer in use. In this mode, the client and the CSI Driver are independent, ensuring that upgrading the CSI Driver does not affect the client.
Sidecar mode
Since CSI Node Service is a DaemonSet component, serverless Kubernetes provided by some cloud platforms does not support the deployment of DaemonSet. In this case, you can use the sidecar mode to run the JuiceFS client in the sidecar container.
The CSI Driver deployed in sidecar mode only has the CSI Controller component. It registers a webhook to listen for container changes. When a pod needs to use JuiceFS PVC, it injects the container with the JuiceFS client into the pod where the application is located and mount it to the application container for use.
You need to pay attention to several situations in the sidecar mode:
- This mode relies on FUSE, so it needs to be allowed to run the container in privileged mode.
- The sidecar container is stateful. When an unexpected restart occurs, the entire pod needs to be rebuilt to recover.
Process mount mode
In process mount mode, the JuiceFS client no longer runs in an independent pod, but runs in the CSI Node Service container. All JuiceFS PVs that need to be mounted are mounted in process mode in the CSI Node Service container.
Since all JuiceFS file systems must be mounted in the CSI Node Service container, this container requires a larger resource declaration. Typically, the resource request is at least 1 CPU and 1 GiB of memory, and the resource constraint is at least 2 CPUs and 5 GiB of memory.
Installing and managing JuiceFS CSI Driver: Kubectl or Helm?
Understanding the three modes of JuiceFS CSI Driver, we can determine that, in the absence of specific needs, the default mount pod mode is preferred.
When attempting to install JuiceFS CSI Driver, the choice between using kubectl and Helm arises. In fact, whether using kubectl or Helm, the final installation results are consistent. The main difference lies in the fact that:
- Helm allows managing all components of JuiceFS CSI Driver with a unified
values.yamlconfiguration file, facilitating maintenance. - Installing JuiceFS CSI Driver with kubectl requires manual handling of subsequent maintenance, increasing complexity and the likelihood of errors.
From a practical standpoint, Helm is a package manager designed for Kubernetes, offering a more intuitive approach to installation, upgrades, and maintenance. Therefore, Helm is the recommended method. Ensure your Helm version is not lower than 3.1.0 before proceeding. For details about how to install Helm, see Installing Helm.
Use Helm to install JuiceFS CSI Driver
1.Execute the following three commands sequentially:
# Add the JuiceFS repository.
helm repo add juicefs https://juicedata.github.io/charts/

# Update the repository.
helm repo update

# Install JuiceFS CSI Driver.
helm install juicefs-csi-driver juicefs/juicefs-csi-driver -n kube-system
2.After you execute the commands, wait for the respective services and containers to deploy properly. Use kubectl to check the deployment status of pods:
kubectl get pods -n kube-system -l app.kubernetes.io/name=juicefs-csi-driver
3.Once JuiceFS CSI Driver components are deployed, you can begin to configure and use it.

Use Kubernetes Secrets to save sensitive information
A typical JuiceFS file system consists of object storage and a database. To access and manipulate the file system, the client needs the object storage's access key / Secret key and the database's URL, username, and password. Obviously, there are certain security risks in using this sensitive information in plain text in a Kubenetes cluster, so we need to use Kubernetes Secrets, a tool specifically designed to store and transmit keys within the cluster.
Kubernetes Secret objects store sensitive data such as keys, passwords, and API tokens in etcd and pass it to pods through volume mounts or environment variables.
For JuiceFS, it is recommended to organize key information for each file system in a dedicated Secret configuration file. If multiple file systems exist, create separate Secret configuration files. During PV creation, reference the corresponding Secret for the file system.
Here is an example of a Kubernetes Secret configuration file for JuiceFS Community Edition. It is named myjfs-secret, corresponding to a file system named myjfs. Replace the values with your actual information:
apiVersion: v1
kind: Secret
metadata:
  name: myjfs-secret
  type: Opaque
stringData:
  name: myjfs
  metaurl: redis://:[email protected]/1
  storage: s3
  bucket: https://myjfs.xxx.com
  access-key: <ACCESS_KEY>
  secret-key: <SECRET_KEY>
  # Set the mount pod timezone. The default value is UTC.
  # envs: "{TZ: Asia/Shanghai}"
  # To create the file system in mount pod, you can add more juicefs format parameters to format-options.
  # format-options: trash-days=1,block-size=4096
Organize the Secret configuration information and write it into a file named myjfs-secret.yaml. Then apply it to the cluster:
kubectl apply -f myjfs-secret.yaml
Note: Configuration items may differ between JuiceFS Community Edition, JuiceFS Cloud Service, and JuiceFS Enterprise Edition. This article uses the Community Edition as an example. For other editions, see the documentation.
PV static and dynamic provisioning
Once JuiceFS CSI Driver is installed, the next step is to consider how to create PersistentVolumes (PVs) on JuiceFS. This involves two ways of using PVs in Kubernetes: static provisioning and dynamic provisioning.
Static provisioning
With this method, everything is created manually in advance. The process of static provisioning is as follows:
- Create a PV.
- Create a PVC and bind it to the PV.
- Create an application and reference the PVC.
You can see the example in the official document.
Static provisioning is suitable when a significant amount of data is stored in the JuiceFS file system and pods need to access this data.
Since the entire process of creating and using PV requires manual operations, it is not suitable for situations where a large number of applications need to create and use PV.
Note that in static provisioning, the root directory of the JuiceFS file system is mounted by default. If you need to isolate data between different PVs, you should configure a mounting subdirectory.
Dynamic provisioning
This method does not require pre-creating PVs. Instead, the rules for creating PVs are defined in StorageClass. When an application requests a PV through PVC, the CSI Driver automatically creates the required PV based on StorageClass.
The process of dynamic provisioning is as follows:
- Create
StorageClass. - Automatically create PV resources through PVC requests.
- Create an application and reference the PVC.
Dynamic provisioning simplifies operational tasks as PVs are dynamically created according to the needs of the application. This is helpful for long-term or large-scale use.
Below are a set of dynamic configuration examples.
Create StorageClass for each JuiceFS file system
You must create separate StorageClass configuration files for each JuiceFS file system. For ease of management, it is recommended that one StorageClass configuration file corresponds to one Secret file.
For example, the following StorageClass configuration is named myjfs-sc, and its corresponding Secret is myjfs-secret.
apiVersion: storage.k8s.io/v1
kind: StorageClass
metadata:
  name: myjfs-sc
provisioner: csi.juicefs.com
reclaimPolicy: Retain
parameters:
  csi.storage.k8s.io/provisioner-secret-name: myjfs-secret
  csi.storage.k8s.io/provisioner-secret-namespace: default
  csi.storage.k8s.io/node-publish-secret-name: myjfs-secret
  csi.storage.k8s.io/node-publish-secret-namespace: default
You must set `reclaimPolicy` according to your specific needs:
Retain: When a PVC is deleted, the corresponding PV is retained and not deleted. Data in the file system is also preserved.Delete: When a PVC is deleted, the corresponding PV is also deleted, and data in the file system is removed. Save the configuration above in a file namedmyjfs-sc.yamland apply it to the Kubernetes cluster:
kubectl apply -f myjfs-sc.yaml
Deploy an application
To visualize the effect of mounting a PV, deploy an Apache httpd server application. Create a configuration file named my-apache.yaml with the following content:
apiVersion: v1
kind: PersistentVolumeClaim
metadata:
  name: my-apache-pvc
spec:
  accessModes:
    - ReadWriteMany
  resources:
    requests:
      storage: 10Gi
  storageClassName: myjfs-sc
---
apiVersion: apps/v1
kind: Deployment
metadata:
  name: my-apache
  namespace: default
spec:
  replicas: 1
  selector:
    matchLabels:
      app: my-apache
  template:
    metadata:
      labels:
        app: my-apache
    spec:
      containers:
      - name: apache
        image: httpd:latest
        volumeMounts:
        - name: data
          mountPath: /usr/local/apache2/htdocs
      volumes:
      - name: data
        persistentVolumeClaim:
          claimName: my-apache-pvc
---
apiVersion: v1
kind: Service
metadata:
  name: my-apache
  namespace: default
spec:
  selector:
    app: my-apache
  ports:
    - protocol: TCP
      port: 80
      targetPort: 80
  type: LoadBalancer
Three resources are declared in this configuration file:
- First, it’s a PVC that declares to use the
StorageClassnamedmyjfs-scto create a PV with a capacity of 10 GiB. - Then, there is a Deployment deploying the httpd application, which references the PVC declared above.
- Finally, there is a Service, which uses the
LoadBalancermode to provide external access.
Upload this configuration to the cluster:
kubectl apply -f my-apache.yaml
After the resources are deployed, you can access the Apache web server using the port mapped by the Service.
As there is no data in the PV yet, the file list displayed on the web page is empty.

To demonstrate successful PV mounting:
- Mount the JuiceFS file system locally on any computer using the JuiceFS client.
- Write some files to the directory corresponding to the PV.
- Check the Apache web server to observe the reaction.
Share access to JuiceFS externally
1.Before starting, ensure that you’ve installed the JuiceFS client locally. If not, visit the download page to install the JuiceFS Community Edition client.
2.Use the following command to mount the file system to an empty directory locally:
juicefs mount redis://:[email protected]/1 $HOME/mnt
As shown in the figure below, after locally mounting the JuiceFS file system, you can see the folder named with the combination of "pvc-" and PV ID in the mount point.
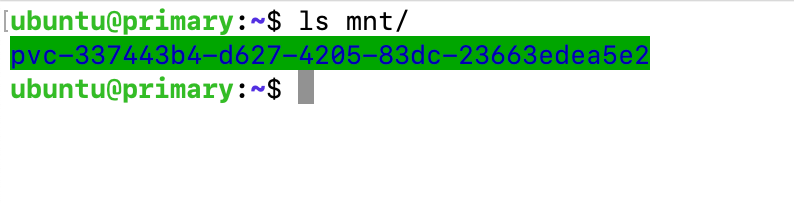
3.As indicated below, you can use kubectl get pvc to check the correspondence between the directory in the mount point and the PV.

4.Write a file named "abc.txt" to the folder at the local mount point:
touch abc.txt
5.Go back to the browser and refresh the page to see the file listed on the page.
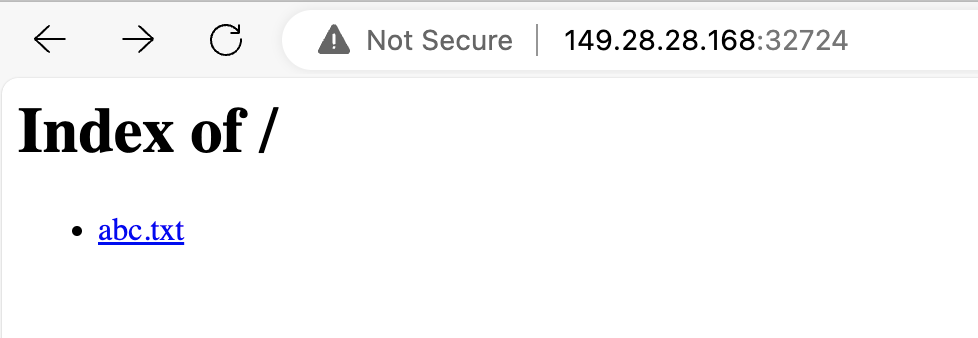
This demonstrates that we’ve successfully applied the PV, and it also verifies that the JuiceFS file system can be conveniently shared and used within and outside the cluster.
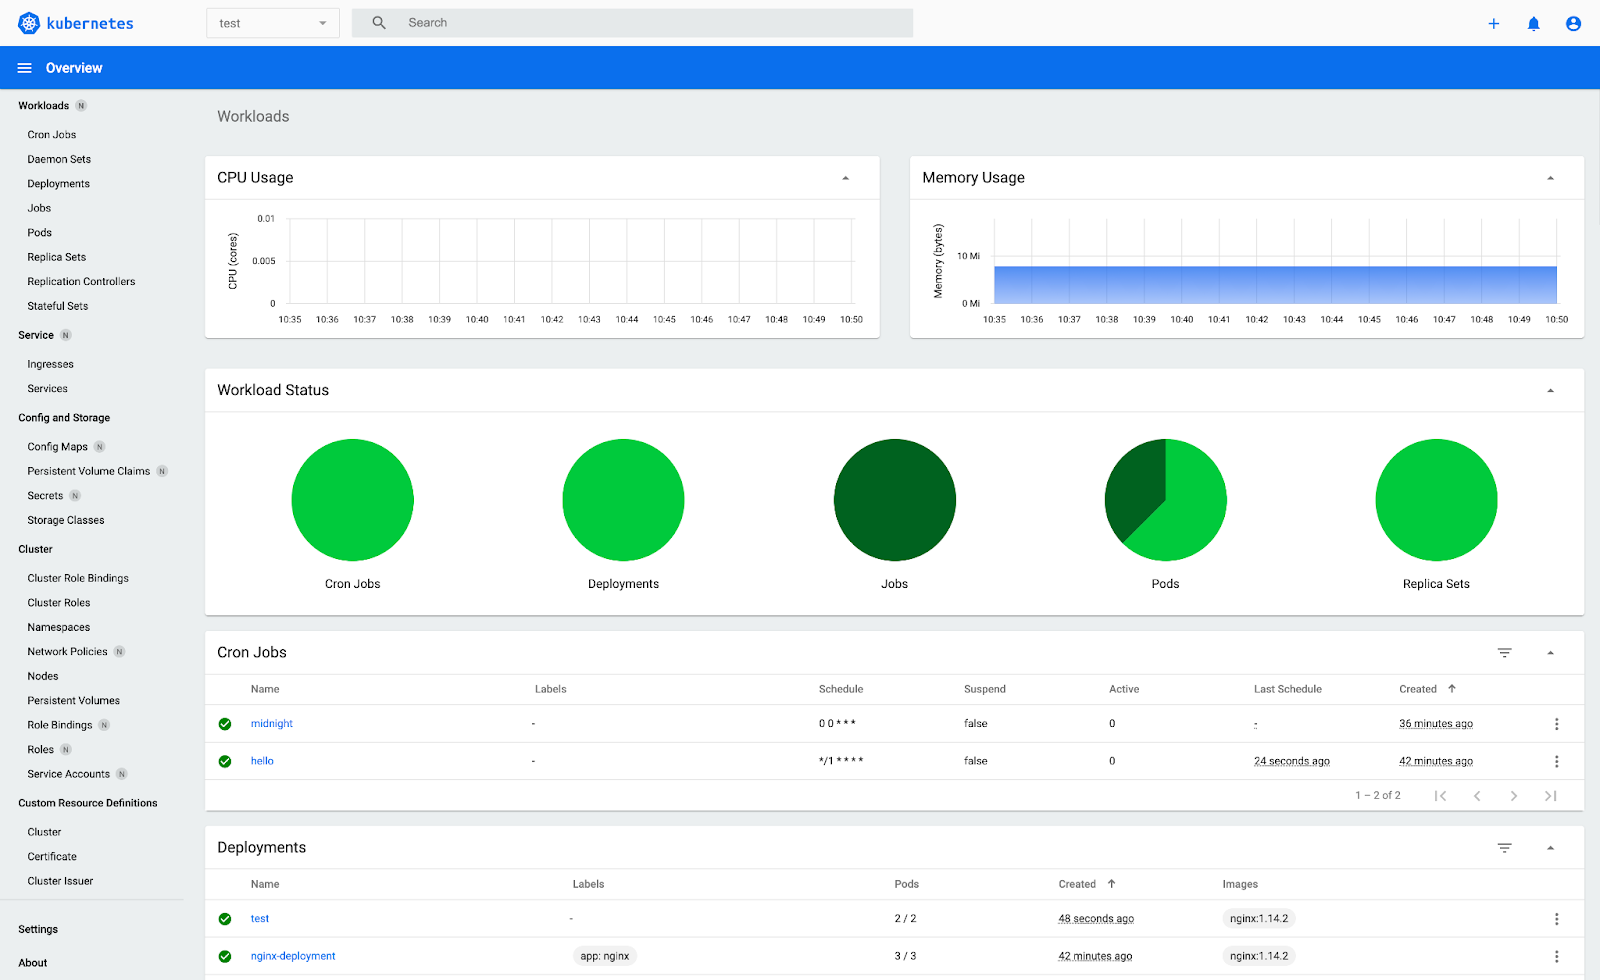
Use JuiceFS CSI Dashboard
When you install JuiceFS CSI Driver, JuiceFS CSI Dashboard is also installed, which is a web-based CSI console. Through the CSI Dashboard, you can understand which application pods are bound to which PV, which StorageClass is created, and which PVs are under them. Additionally, you can view the configuration of various resources. This makes troubleshooting more straightforward.
You can access the CSI Dashboard in the browser using http://localhost:8088.
Conclusion
By now, you’ve acquired the basic knowledge of persisting data with JuiceFS in Kubernetes. However, since managing Kubernetes clusters almost always involves command-line operations, if you are not yet proficient, it is recommended to try installing and using the Kubernetes Dashboard. Its web UI allows you to more intuitively manage various resources in the cluster.
With a graphical dashboard, troubleshooting failures during the installation of JuiceFS CSI Driver or creating PVs for applications becomes easier. For instance, when I was writing this article, the test cluster's nodes were allocated only 1 GB of memory each. After installing the CSI Driver, the juicefs-csi-controller controller failed to start. It was only through the error messages provided on the Dashboard that I discovered the issue was due to insufficient memory. After I upgraded the node memory to 2 GB, all resources of the CSI Driver were successfully deployed and started.
If you’d like to delve further into advanced usage of JuiceFS in Kubernetes, see official JuiceFS CSI documentation.
If you have any questions or would like to learn more, feel free to join JuiceFS discussions on GitHub and our community on Slack.