Artificial intelligence (AI) technology has advanced rapidly, drawing significant attention to AI-generated content. Text-to-image generation, including impressive models like Stable Diffusion, has captivated developers. Unlike Midjourney's text-to-image service, Stable Diffusion is an open-source deep learning model that lets users personalize and train their own image styles, making it highly appealing.
However, using Stable Diffusion requires downloading and installing large model data sets for training, leading to time-consuming and storage-intensive processes. Collaboration among users on different computers exacerbates the issue, and failure to back up data promptly can result in irreversible losses.
Thankfully, JuiceFS offers a solution for persistent and shared storage of model data. As an open-source, high-performance distributed file system, JuiceFS can create a file system similar to a portable hard drive, accessible on any computer with Stable Diffusion. This shared storage approach is particularly advantageous for team usage, enabling multiple devices to access the same pre-trained model data.
In this article, I'll guide you on using JuiceFS Cloud Service to create the shared storage solution, allowing seamless access to Stable Diffusion's pre-trained model data.
What’s JuiceFS
JuiceFS is an open-source, high-performance distributed file system designed for the cloud, released under the Apache License 2.0. By providing full POSIX compatibility, it allows almost all kinds of object storage to be used as massive local disks and to be mounted and accessed on different hosts across platforms and regions.
The JuiceFS architecture
The following figure shows its architecture:
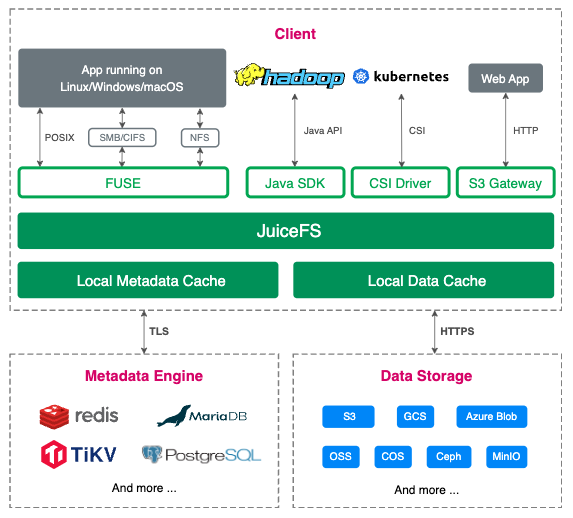
The JuiceFS file system consists of three parts:
- JuiceFS clients
- Data Storage: File data will be split and stored in object storage
- Metadata Engine, which contains:
- Common file system metadata like file name, size, permission information, and creation time
- JuiceFS specific metadata like file data mapping, reference counting, and client session
JuiceFS creates a file system using network-based object storage and databases, enabling cross-platform and cross-network shared access capabilities. To address the latency issues of object storage and databases, JuiceFS introduces a caching layer that caches frequently accessed data locally, improving access speeds. The caching layer automatically manages cache space and strategies based on user configurations to ensure data consistency and integrity. Through the caching layer, JuiceFS achieves millisecond-level latency and near-infinite throughput.
JuiceFS supports multiple access interfaces, including FUSE POSIX mount, S3 Gateway, CSI Driver, Hadoop HDFS API, and WebDAV. It can be mounted locally like a network drive, allowing users to interact with JuiceFS directly. It can also be integrated into specific platforms using dedicated interfaces.
JuiceFS Community Edition vs. Enterprise Edition
JuiceFS offers both an open-source Community Edition and an Enterprise Edition (hosted on-premises or in the cloud). In this article, we use JuiceFS Cloud Service. This is because both editions share a common core architecture, but they have these differences:
- The Community Edition requires users to set up their own databases and object storage.
- The Cloud Service edition uses JuiceFS' official databases and provides additional advanced features.
Opting for the JuiceFS Cloud Service simplifies the process as users only need to provide their own object storage and create a file system on the JuiceFS website. For users who want to try it out, there is no need to worry about costs as currently, creating a file system of 1 TB is free.
Note: The capacity mentioned in the JuiceFS Cloud Service pricing refers to the maximum capacity of file systems that users can create on the platform. A file system consists of the database provided by the platform and the user's self-provided object storage. Users access and write files in the file system through the JuiceFS client, with the file data stored in the user's own object storage. In other words, the free tier allows the creation of a 1 TB file system, indicating that the maximum data that can be stored in the user's object storage for this file system is 1 TB.
For more details about JuiceFS Community Edition vs. Enterprise Edition, check out JuiceFS Enterprise Edition: Architecture, Features, and Community Edition Comparison.
Next, we’ll explore how to use JuiceFS Cloud Service to create a shared storage solution and facilitate shared access to Stable Diffusion's pre-trained model data.
Step 1: Create shared storage using JuiceFS
Create a file system
1.On the JuiceFS website, register and login to the cloud service dashboard.
2.Click Create Filesystem.
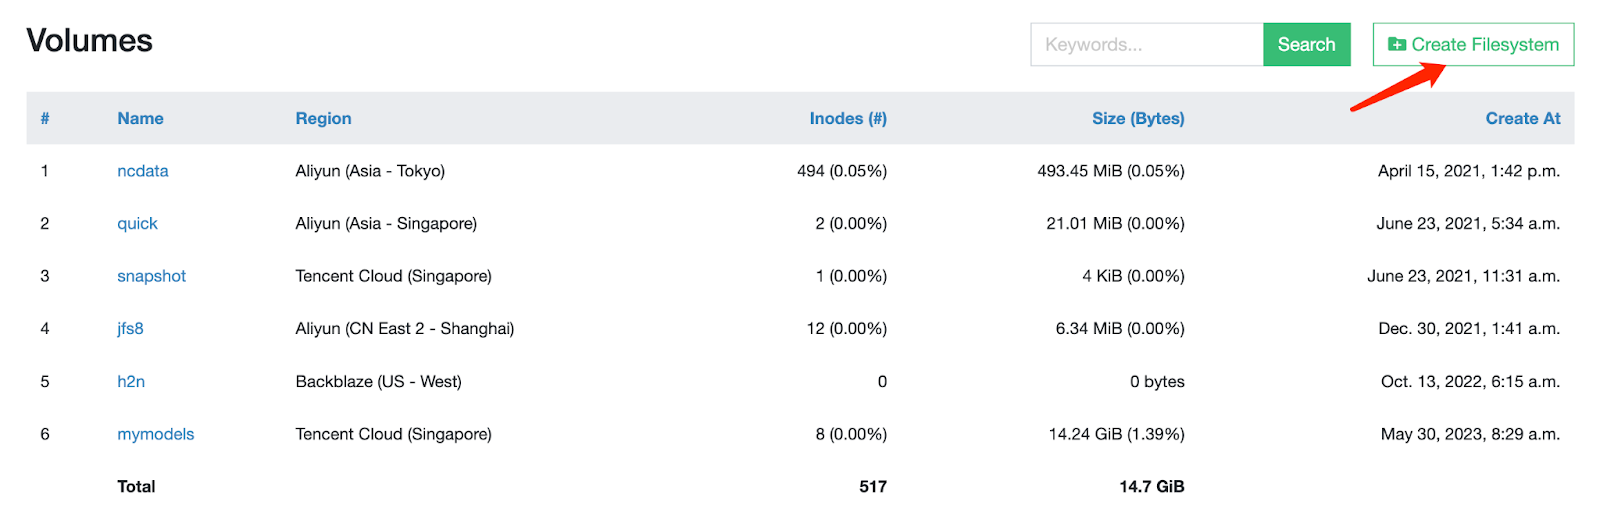
3.Fill in the required information to create a file system.
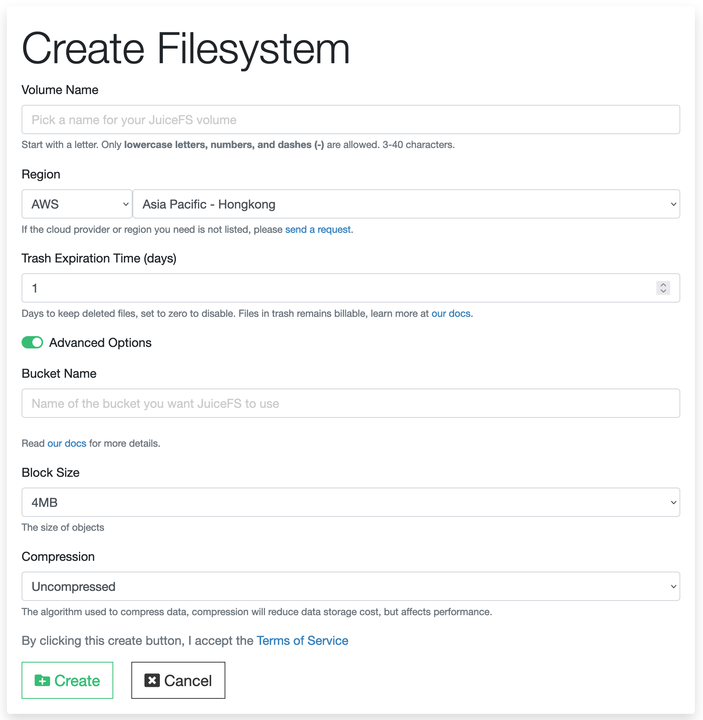
The creation of a file system involves the following options:
- Volume Name: Set a unique name according to the specified format required by the platform.
- Region: If your Stable Diffusion is installed on a cloud server, select the cloud platform and region where it is deployed. If you are using Stable Diffusion on your local computer, choose the cloud platform and region where your object storage is located.
- Trash Expiration Time (days): This is JuiceFS' data safety mechanism. When it’s enabled, files are not immediately deleted but retained in the object storage according to the set duration. They are then deleted after the specified period expires. For scenarios involving the storage of model data with Stable Diffusion, you can set it to 0 to disable the Trash retention.
- Bucket Name: This is the name of the user-provided object storage bucket. You can create a storage bucket in advance on the cloud platform and enter the bucket name here. Alternatively, the bucket can be automatically created by the client when mounting the JuiceFS file system.
- Other options: Keep the default settings.
Install the client and mount the file system
After you created the file system, you are automatically redirected to the Settings tab. Now, you can install the client on any computer that needs to access this file system by executing the following command:
sudo curl -L https://juicefs.com/static/juicefs -o /usr/local/bin/juicefs && sudo chmod +x /usr/local/bin/juicefsJuiceFS is a cloud-based file system, and the free tier allows simultaneous mounting and usage on up to 100 devices. This means you can now mount and use it on any computer, store Stable Diffusion model data, and then mount the file system on other servers that also require access to the same model data. This enables all your devices to share the same pre-trained model.
Note:
JuiceFS Cloud Service only supports macOS and Linux systems. If you want to use it on a Windows system, you can use Windows Subsystem for Linux (WSL). Alternatively, you can explore JuiceFS Community Edition. For details, see the Community Edition documentation.
Step 2: Use Stable Diffusion to access shared storage
Stable Diffusion is not a single software, but a collection of open-source AI models. To generate images using these models, you need to install or access programs or platforms that can run the models, such as the web-based Stable Diffusion web UI, the desktop version DiffusionBee, or the iPad-compatible Draw Things.
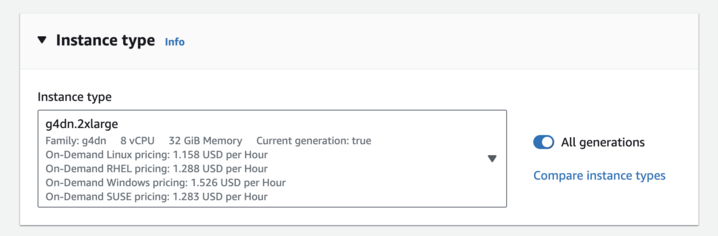
If you don't want to invest heavily in computer hardware for AI image generation, you can use GPU cloud servers provided by cloud computing platforms. The hourly prices of some spot instances are as low as a few dollars. You can choose spot instances on cloud computing platforms, such as AWS g4dn.2xlarge instances, which provide 8-core CPUs, 32 GB of memory, and an NVIDIA Tesla T4 GPU with 16 GB of memory. However, spot instances may be automatically released and terminated when higher bidders appear on the platform. Therefore, when you use such cloud servers, you should save your model data carefully.
Taking a GPU cloud server as an example, I'll now guide you through the process of installing the Stable Diffusion web UI. You’ll soon realize that JuiceFS' shared access feature greatly enhances the capabilities of Stable Diffusion in this context.
Install the Stable Diffusion web UI
Assuming you have created a GPU cloud server with the aforementioned configuration on AWS, running Ubuntu 22.04. Follow these steps to install the Stable Diffusion web UI.
1.Install the required software packages and the NVIDIA graphics driver.
# Install dependencies

sudo apt install build-essential libgl1 dkms
# Switch to the root user
su
# Download the driver (Please visit the NVIDIA website to find the latest version link. The following is just an example.)
wget https://cn.download.nvidia.com/tesla/460.106.00/NVIDIA-Linux-x86_64-460.106.00.run
# Install the graphics driver
sh NVIDIA-Linux-x86_64-460.106.00.run --ui=none --disable-nouveau --no-install-libglvnd --dkms -s
# Check if the driver is installed successfully (The return of graphics card information indicates a successful installation)
nvidia-smi
2.When you complete installing the graphics driver, it’s recommended to restart the system.
3.Install the Stable Diffusion web UI program as a regular user.
# Install project dependencies
sudo apt install wget git python3 python3-venv
# Install the Stable Diffusion web UI
bash <(wget -qO- https://raw.githubusercontent.com/AUTOMATIC1111/stable-diffusion-webui/master/webui.sh)
Run the Stable Diffusion web UI
1.The Stable Diffusion web UI is installed in the Python virtual environment. Therefore, you need to activate the virtual environment before you launch it.
# Activate the virtual environment
source venv/bin/activate
# Launch the program
python webui.py – –listen
2.After you successfully launch the program, you can access it through a web browser. Assuming the IP address of the cloud server is “111.222.33.44”, the access address would be “111.222.33.44:7860”.
Use JuiceFS to store models
The model files for the Stable Diffusion web UI are located in the models directory. Place the model files in the corresponding folders based on their types. For example, if you downloaded a checkpoint model from the Civitai website, place it in the models/Stable-diffusion directory. For variational autoencoder (VAE) models, place them in the models/VAE directory.

Now that you understand the directory structure for storing models, you can proceed to mount the JuiceFS file system to the model directory. Go back to the JuiceFS website console, open the Settings tab of the file system as shown in the figure below.
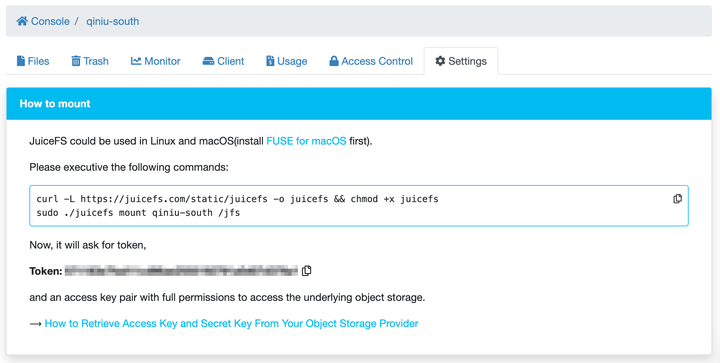
Mount the JuiceFS file system to the $HOME/jfs directory for the current user. During the mounting process, the program prompts for the file system's token as well as the access key and secret key of the object storage. Enter the required information accordingly.
sudo /usr/local/bin/juicefs mount mymodels $HOME/jfsYou can replace "mymodels" in the mount command with the name of your file system, and the mount point path can also be replaced with your desired path.
Once the file system is successfully mounted, you can use $HOME/jfs as a network drive. All files stored in this directory will be saved to the associated object storage. At the same time, you can install the JuiceFS Cloud Service client on other computers and execute the same mount command to share and read/write the stored files.
You can copy all the pre-trained models to the $HOME/jfs directory. However, for better management of different types of models, it’s recommended to create a corresponding directory structure in $HOME/jfs that matches the models directory. For example, create a Secure Digital (SD) directory specifically for Stable-diffusion models, a VAE directory for VAE models, and an Lora directory for Lora-related models, and so on.
Creating directories in the JuiceFS file system based on the model categories will be helpful for future use. This allows you to use JuiceFS' subdirectory mount feature to mount specific directories to the corresponding subdirectories under the models directory, avoiding the need to modify project configurations to adjust the model's location. You can use JuiceFS' subdirectory mount feature or create symbolic links to map the subdirectories to the Stable Diffusion model directory.
For example, mount the SD directory to $HOME/stable-diffusion-webui/models/Stable-diffusion/jfs and mount the VAE directory to $HOME/stable-diffusion-webui/models/VAE/jfs.
Note:
Here, we assume that the Stable Diffusion web UI is deployed in the $HOME directory. Please replace the subdirectory, mount point path, and file system name with the actual information.
# Mount the SD subdirectory to models/Stable-diffusion/jfs
sudo juicefs mount mymodels --subdir SD $HOME/stable-diffusion-webui/models/Stable-diffusion/jfs
# Mount the VAE subdirectory to models/VAE/jfs
sudo juicefs mount mymodels --subdir VAE $HOME/stable-diffusion-webui/models/VAE/jfs
You can also use symbolic links to map JuiceFS directories to the model directories:
# Assume that the file system is mounted at $HOME/jfs
ln -s $HOME/jfs/SD $HOME/stable-diffusion-webui/models/Stable-diffusion/jfs
After a successful mount, click the refresh button in the application interface's top-left corner to see all available models.
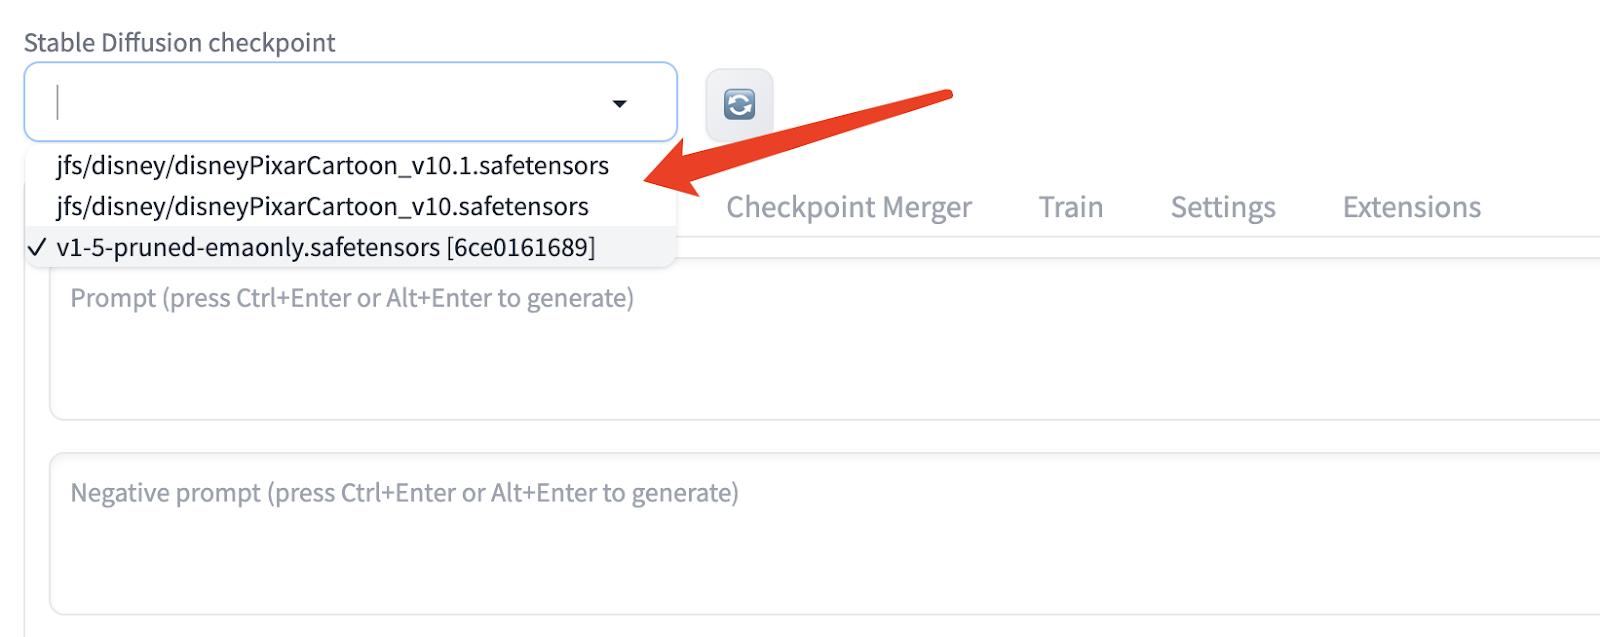
As JuiceFS is a shared file system, you can use the same method to mount the model data on other cloud servers or local computers.
Step 3: Train you own Stable Diffusion model
In addition to using pre-trained models for the out-of-the-box text-to-image and image-to-image functionalities, another major advantage of Stable Diffusion is the ability to train your own models using any base model.
Common approaches to training models with Stable Diffusion include:
- Full model fine-tuning: Further train the base model with a new dataset to maintain the capabilities of the base model while improving its quality and performance. This approach requires more time and resources and may lead to overfitting or underfitting.
- Lora fine-tuning: Inject low-rank matrices into the base model to adapt it to new data and tasks. It can be thought of as "patching" the base model. This approach saves time and computational resources and does not compromise the capabilities of the base model. However, it requires more data and training techniques, and the capabilities of the base model may become limitations.
- DreamBooth fine-tuning: Fine-tune the base model using a small set of specific theme images to create a new model that can be used independently. This approach only requires a small number of training images. However, it may result in the new model losing the characteristics or capabilities of the base model.
- Text inversion: This approach is similar to DreamBooth in principle but implemented differently. It also teaches the model new concepts or styles, resulting in files that need to be used alongside the base model. However, it requires specific keywords to activate the newly trained concepts.
Here, we’ll use DreamBooth as an example to demonstrate how to perform fine-tuning training in the Stable Diffusion web UI.
DreamBooth Principle
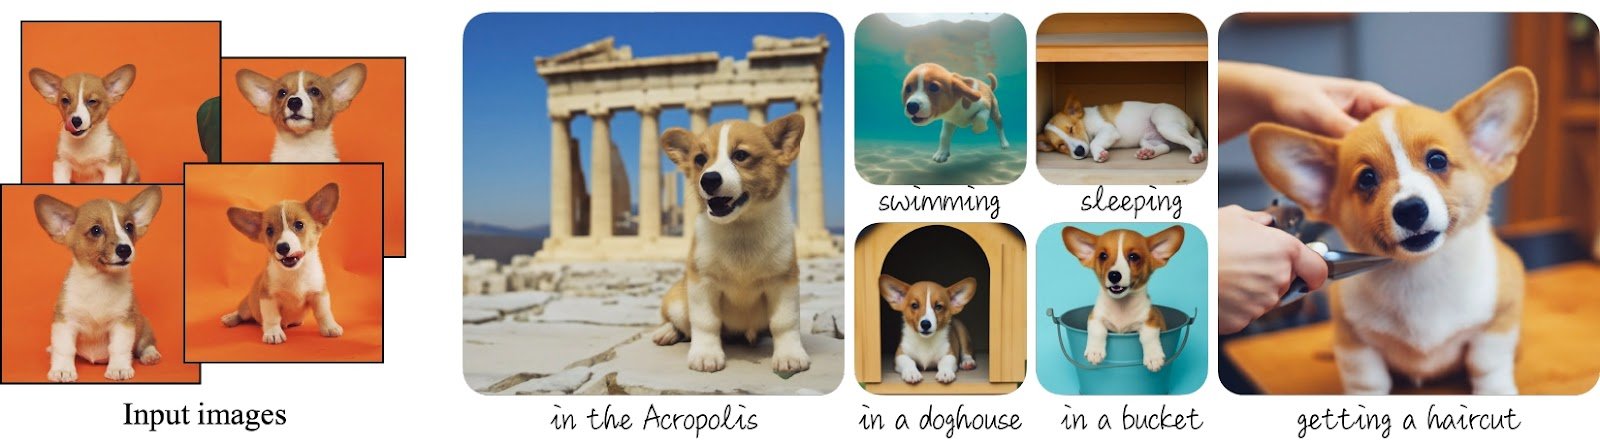
As shown in the figure above, DreamBooth works this way:
- Train the base model of Stable Diffusion with 3-5 specific theme photos, for example, different angles of a small dog, to enable the model to learn the features of this specific object, for example, a dog named Lafa.
- By using the prompt "a Lafa dog in a bucket," the model generates a photo of this dog in a bucket.
In other words, whenever the prompt contains "a Lafa dog," it directly uses the features of this specific dog instead of randomly generating a different dog.
Using DreamBooth in the Stable Diffusion web UI
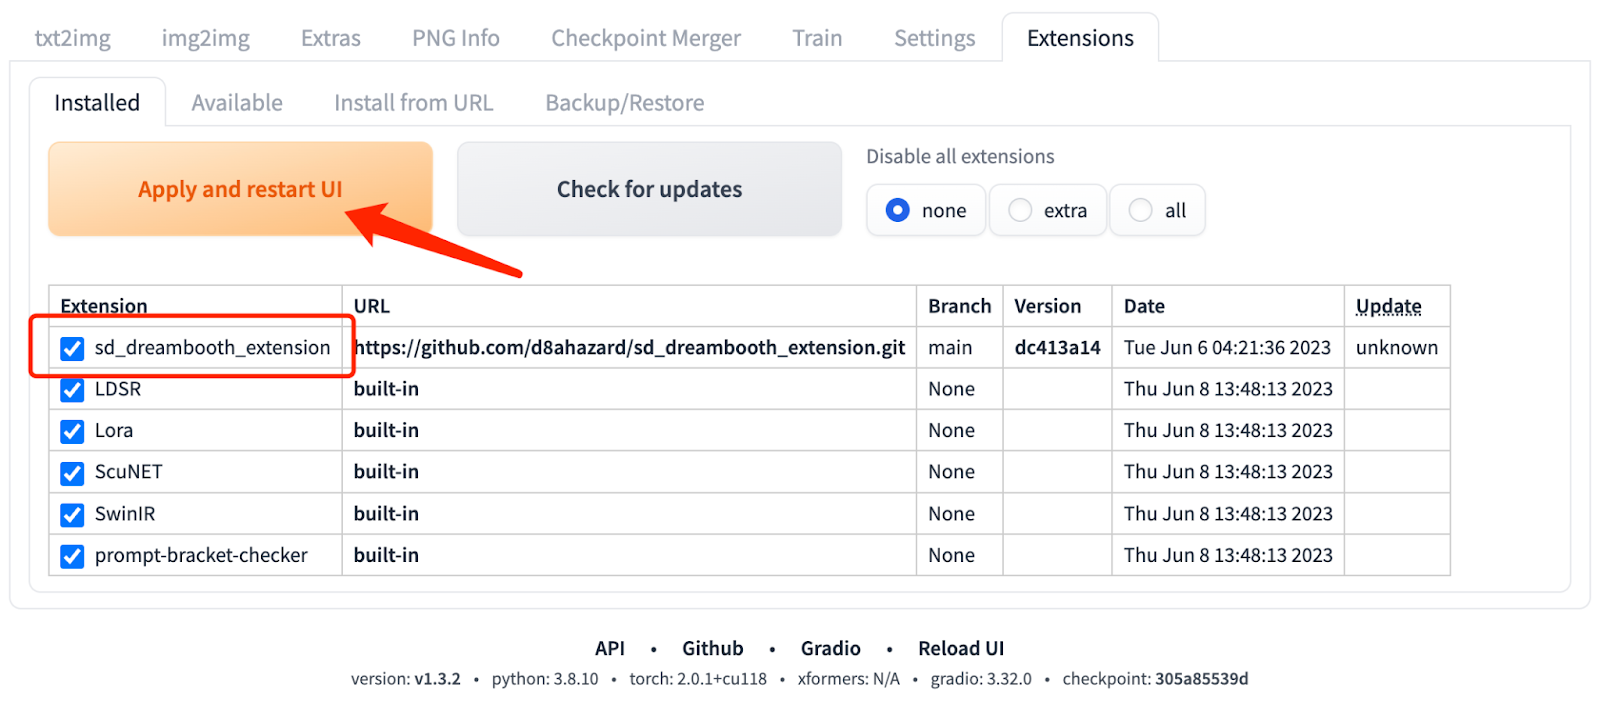
1.DreamBooth extension is not installed by default in the Stable Diffusion web UI. Search for it in the extensions and install it.

2.Switch to the Installed tab and click Apply and restart UI. If the DreamBooth tab is still not visible, you need to restart the Stable Diffusion web UI.
3.To use DreamBooth for fine-tuning, create a new model. Enter the name of the new model and select the base model. Creating a new model takes some time, depending on the hardware configuration.
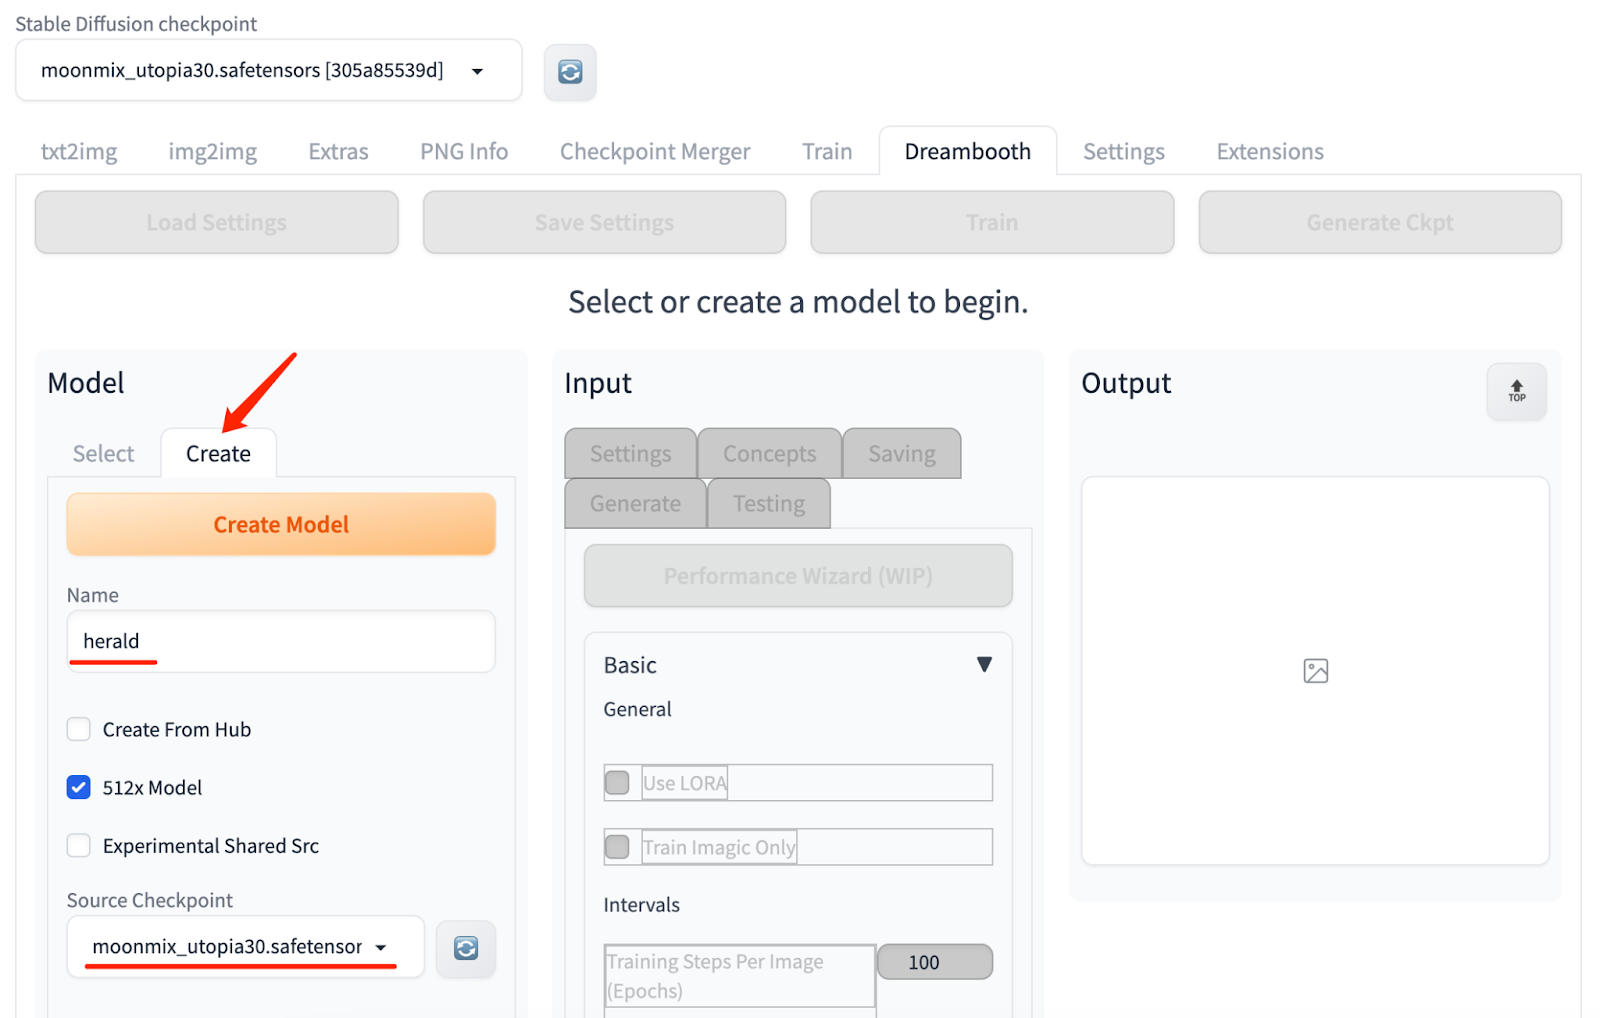
4.Select the newly created model. To fine-tune this model, place the prepared photos in a location accessible by the Stable Diffusion web UI.
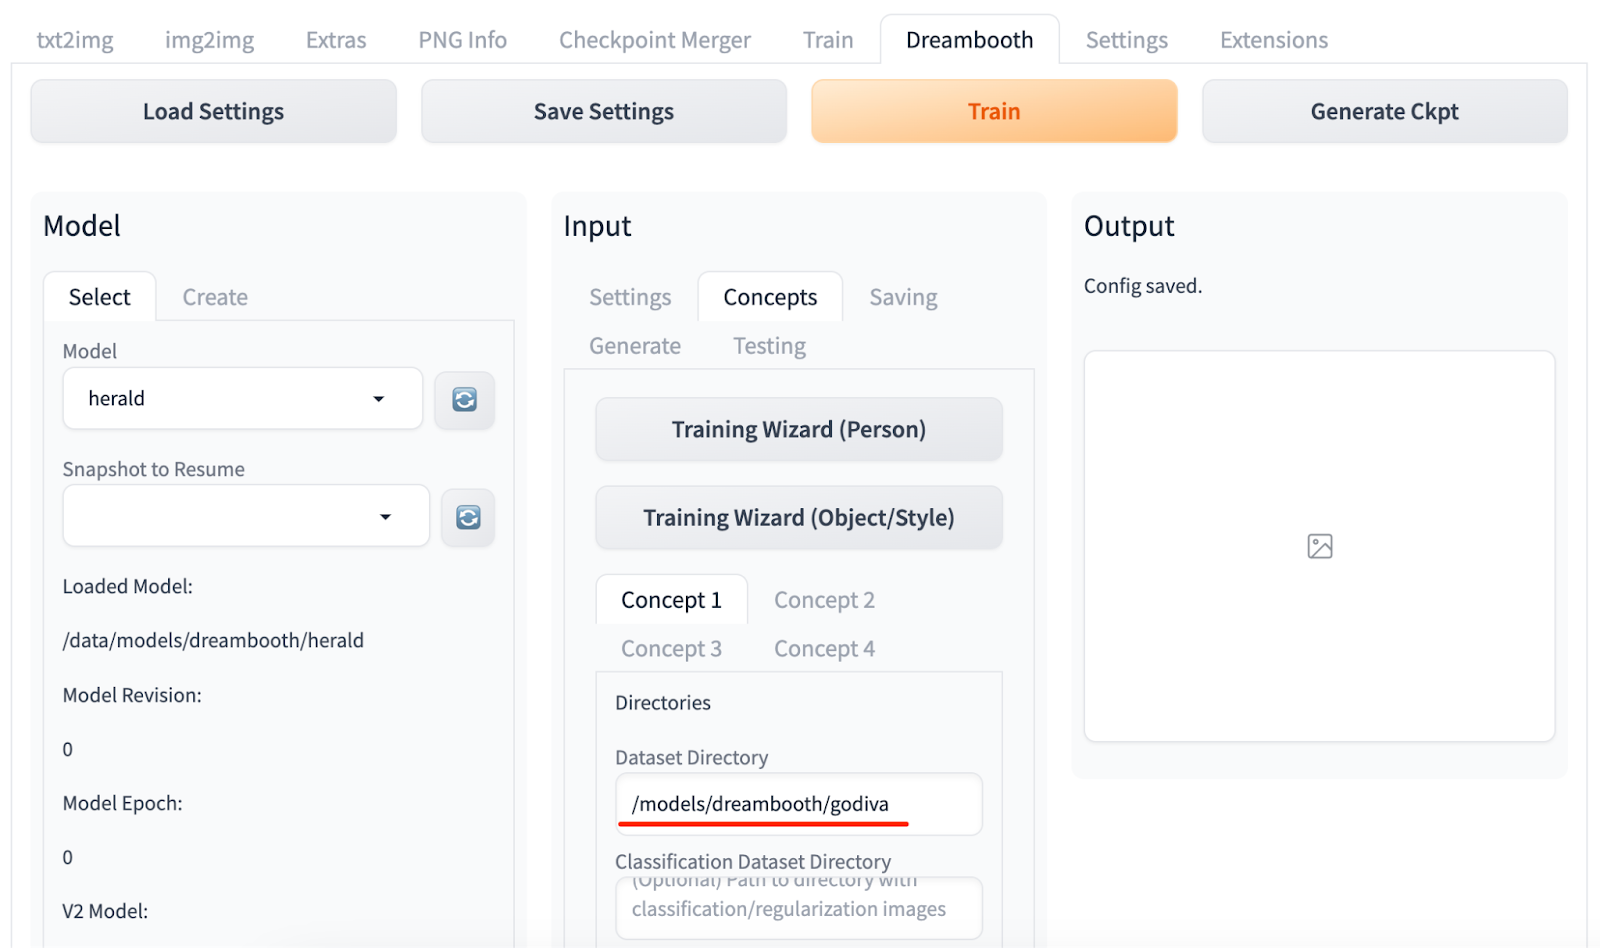
Note:
When you prepare photos for model training, select photos of a person or object from different angles. You must ensure clear visibility of the subject's features without obstruction. A quantity of 3 to 5 photos is sufficient, and the image size should match the specifications set for training parameters (512x512 pixels by default).
5.In the Concepts tab of the Input section, add instance prompts, category prompts, and reverse prompts for the prepared photos. Adjust the training iterations, algorithms, and other settings based on the hardware configuration.
6.Click Train to start the training process. The duration of training depends on the hardware and training parameters like training cycles.
By default, during training, the model data is automatically written to the newly created model. You can switch to the txt2img tab at any time to check the model's results.
7. After training is complete, you can click Generate Ckpt to save the model as a .ckpt file. (optional)
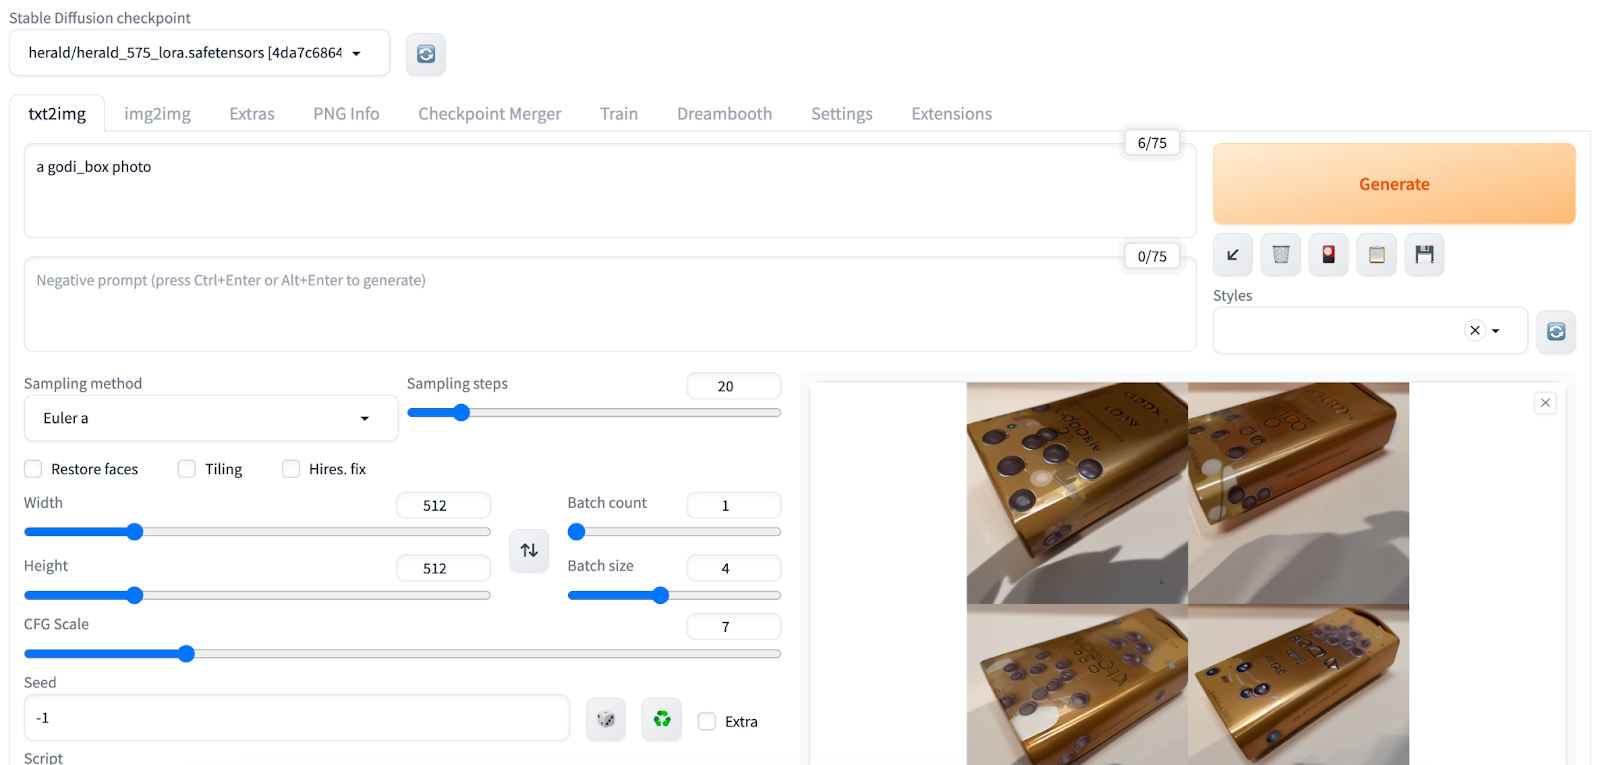
As shown in the figure below, I used 5 photos of chocolate boxes as input and trained a model called "godi_box". Whenever the keyword is used in the prompt, the model generates the corresponding box in the scene.
The models trained using DreamBooth are located in the models/dreambooth directory. You can create the DreamBooth directory in advance in the JuiceFS file system and mount it in Stable Diffusion using the method described earlier.
# Mount the subdirectory dreambooth to models/dreambooth
sudo juicefs mount mymodels --subdir dreambooth $HOME/stable-diffusion-webui/models/dreambooth
Summary and tips
This article introduced how to use JuiceFS Cloud Service to create a shared storage solution and facilitate shared access to Stable Diffusion's pre-trained model data. JuiceFS, a high-performance distributed file system tailored for cloud-native environments, enables seamless integration of nearly all object storage as extensive local disks, mountable for read and write operations across various platforms and regions. The collaboration between JuiceFS and Stable Diffusion establishes an efficient, reliable, and user-friendly shared storage solution, effectively addressing the challenges associated with model data storage.
Throughout your journey with JuiceFS and Stable Diffusion, it's essential to keep the following key points and tips in mind:
- Object storage costs: Users are responsible for bearing the costs of storing and transferring data via the object storage used by JuiceFS. This includes downstream data transfer fees, particularly for cross-network usage, as well as read and write request expenses. To optimize costs, we recommend employing object storage in the same platform and region as your cloud servers, making the most of the platform's internal network and reducing overhead. For users operating local computers, selecting object storage with close physical proximity is advised. Additionally, availing storage, data, and request packages offered by cloud platforms can lead to cost efficiencies.
- JuiceFS cache space and strategies: JuiceFS incorporates local caching to accelerate access to frequently accessed data. Users can tailor cache space and strategies based on their requirements and available disk space. This involves configuring cache size, cache expiration duration, and cache cleanup approaches. For details, see the JuiceFS documentation.
I hope this article can help you maximize Stable Diffusion's potential in creating your digital art projects. If you have any questions or suggestions, let us know via joining our discussions on GitHub and community on Slack.